Apple Mail Email Setup Print

  • 0

OVERVIEW

Apple Mail is the default email client that comes with Macs using OS X 10.0 or later. This will help you to configure your Apple Mail program.

This article was created using Mail version 10.2 on Sierra (OSX 10.12.32). Yours may differ depending on what version of Mac OSX you are using.

THINGS YOU NEED

Be sure to have these handy, you can get/reset these through cPanel which you can access through https://my.4web.ca:

  • Domain name: example.com
  • Email address: username@example.com
  • Email password.

INSTRUCTIONS

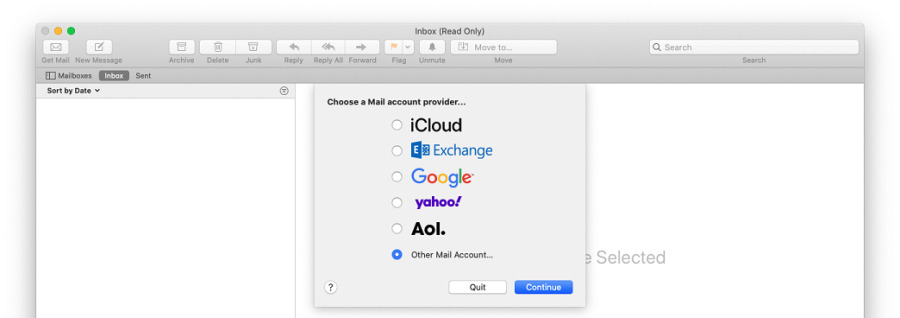
1 - Open Mail. If you haven't added a new account yet, you'll be taken directly to the Add Account prompt.
1a - If you're adding an additional account, or this prompt doesn't otherwise load automatically, you'll need to select Add Account from the Mail menu.
 
2 - From the Add Account prompt, select Add Other Mail Account then Continue.
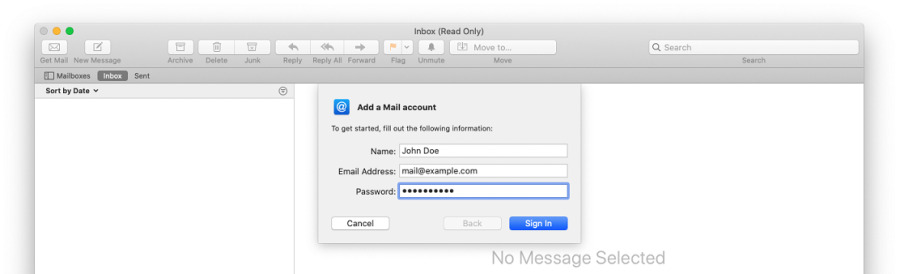
3 - Enter your email account information and click create. 
  • Full Name: Your name as you would like it to appear on your emails
  • Email Address: Your whole email address.
  • Password: The password for your email account
4 - Mail will attempt to contact the mail server. The default search uses "autodiscover.domain.com"
4a - When an autodiscover setting has been unsuccessful, the message "Unable to verify account name or password" will appear in a new settings box.
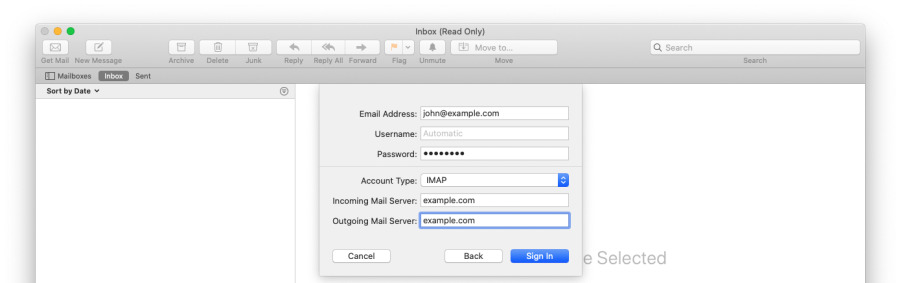
5 - Fill in the fields using your email info and access domain. If you do not see this box and are using a version of Apple Mail that was released prior to OSX Sierra, skip to "Additional steps for older versions of apple mail". 
  • Email Address: Your full email address.
  • User Name: Your full email address. 
  • Password: The password to your email account. 
  • Account Type: IMAP uses our servers for storage, POP3 uses your computer for storage and removes the message from the server.
  • Incoming Mail Server: using your domain (example mail.domain.com)
  • Outgoing Mail Server: using your domain (example mail.domain.com)
Please note that by default, Apple Mail versions 10 and higher use secure (SSL) connections for both incoming and outgoing servers. We highly recommend that you do not change this, but SSL and port settings may be modified under server settings in the preferences menu once setup is complete.
 
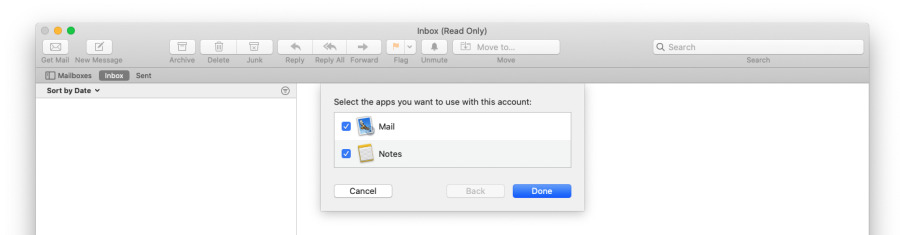
6. You'll then be asked to confirm which apps that you'd like to attach the email account to. Select email and any others that you'd like and click Done. 
 

OLDER VERSION?

Additional steps for older versions of Apple Mail
Older versions of Apple Mail may show two separate boxes for the incoming and outgoing server settings. If this is true for you, use the following settings:
 
Account Type: IMAP or POP3 (recommended IMAP)
 
Incoming Server Info

Incoming Mail Server: using your domain (example mail.domain.com)

Path Prefix: Enter /INBOX here (all capital letters).

Port: You will want to connect using the correct port based on the settings you have selected.

  • IMAP: 993
  • POP: 995
Outgoing Server Info

Outgoing Mail Server: using your domain (example mail.domain.com)

Port: You will want to connect using the correct port based on the settings you have selected.

  • SMTP: 587

NOTE:
You may encounter an Unverified SSL Certificate warning if you have chosen to connect with SSL. This is common if you do not have your own SSL Certificate installed. You can add the certificate to your trust settings to avoid seeing this message in the future. The encryption in use IS safe, so you can safely select "Connect" to continue.

  • Authentication: Be sure that Password is selected from the dropdown menu.
Your email account has been created. One more step - Select "Preferences" from the Mail menu, and click on the "Accounts" tab from the Preferences window.
    1. Select your new account from the left hand column.
    2. Click the "Advanced" tab and uncheck the box to "Automatically detect and maintain account settings."
    3. Navigate back to the "Account Information" tab. This time, select Edit SMTP Server List... from the Outgoing Mail Server (SMTP) drop-down menu.
    4. You will be taken to the SMTP server list. Make sure that you have selected the correct email address. Click the Advanced tab and verify the following settings:
      • Be sure the box to "Automatically detect and maintain account settings" is not checked!
      • Enter your desired outgoing mail port. We use port 587.
      • Select "Password" from the Authentication drop-down menu, and make sure the "Allow insecure authentication" box IS checked. If you don't see this option, you may need to update Apple Mail or Yosemite to the newest version.

That's it! You just configured your Mac to use 4Web's email service.


Was this answer helpful?

« Back